How To Avoid Bubbles In Nail Polish
Get a perfect manicure with these tips to get a uniform layer of nail paint every time.

Simone de VlamingBeauty Expert
Expertise: Makeup
Experience: 5 years
Simone de Vlaming is a beauty expert and founder of Beautymone.com. She specializes in makeup, skin care, fragrances, and nails. Simone decided to start a beauty blog during her graduation to find an outlet for her passion. She also worked ... more

Esha Saxena MA (Mass Communication & Media Studies)
Expertise: Makeup & Beauty
Experience: 3 years
Esha Saxena is a writer and journalist with over 3 years of experience. She holds a master’s degree in media and mass communication from St. Francis College for Women, Hyderabad, and firmly believes... more

Madhumati ChowdhuryMA (English Literature)
Expertise: Beauty & Lifestyle
Experience: 7 years
Madhumati is an associate editor with seven years of professional experience. She has previously worked as an editor, proofreader, and a writer with various organizations, helping her navigate through... more

Vaishali SinhaMA (Comparative Literature)
Expertise: Beauty & Lifestyle
Experience: 5 years
Vaishali Sinha is a beauty and lifestyle writer with five years of experience in writing for various genres. She has a master’s degree in Comparative Literature from Jadavpur University. She combine... more

Image: Shutterstock
You did everything right while giving yourself a manicure — avoided any spills, ditched all bumps, and steered clear of any dents. However, you missed the chapter on ’how to avoid bubbles in nail polish’ in your manicure textbook, and now all your efforts are in vain. Isn’t it what the nightmares of many women are made of?
Unfortunately, this problem doesn’t come with any fast and easy fixes. Once the pesky bubbles appear, your only option is to start afresh and redo your nails. But, fret not! In this article, we will address the issue at its root and share how you can prevent bubbles from forming in your nail polish. Read on.
 Keep In Mind
- Brand: Choose well-known nail polish brands that are renowned for their use of premium quality nail polish ingredients.
- Nail Care: Keeping the nail bed absolutely clean by buffering it and polishing it helps apply a neat coat and prevent bubbles.
- Nail Polish Look: Getting a fresh manicure before nail polish application helps create a fine look and increases its aesthetic appeal.
- Aftercare: While nail polish can’t be avoided altogether, it is important to give the nails some rest at times and avoid applying nail polish to prevent dryness or brittle nails.
In This Article
Why Does Your Nail Polish Bubble Up?
As hard as you try to avoid it, it happens to the best of us. Bubbles appear mostly during the nail polish drying process when air gets trapped between the layers of polish. There are a few reasons this happens: your nail polish was too thick, you didn’t wait long enough before going in with the next coat, you didn’t apply a clear base coat, or you are using an expired nail polish.
No matter what your reasons, here are some nail polish techniques you can use to beat the bubbles for good.
How To Avoid Bubbles In Your Nail Polish
1. Clean Your Nails

Prepping is a must before you begin applying nail polish. Greasy or dirty nails prevent nail polish from adhering well. Always wash your hands with soap and water first. Wait for your nails to dry completely. Then, wipe them with a cotton ball soaked in acetone to remove any oil or dirt from the nail bed.
2. Always Apply A Base Coat

Much like putting on primer before your foundation, a base coat is necessary for a smooth and even finish. Applying a base coat not only prevents nail discoloration, but it also extends the wear of your manicure. Since your nails emit natural oils that prevent the nail polish from adhering well, a base coat is the best way to seal these oils in.
3. Inspect Your Nail Polish

You can’t expect an old, gloopy polish to give you a smooth finish. It is just not realistic.
Test your nail polish beforehand with a quick swipe across your nail to check if it is the right consistency. If your polish is thick, dense, and sticky, either thin it out with lacquer thinner or throw it away.
During this inspection, it is also a good idea to check the brush. If there are bubbles on the brush they will most likely transfer onto your nails. Just re-dip the brush into the polish, roll it between your fingers, and check again.
4. Always Press Out The Brush
To avoid any air bubbles, loose bristles, or little dust flakes that may end up in your brush, make sure to press out the brush before applying the nail polish.
5. Roll The Bottle
Shaking a bottle of nail polish vigorously is probably the number one mistake we have all made. Pumping the brush in and out of the bottle’s neck is another blunder. Doing so only traps the air inside the bottle, which creates tiny pockets where bubbles form.
Those air bubbles, when transferred onto your nails, sometimes leave noticeable holes in your manicure. If your polish has separated, the best way to deal with it is to simply roll the bottle between your hands like you are rolling dough.
6. Apply Thin Coats

The key to a perfect manicure lies in its application. If you have too much polish on your brush, you are in for a mess. You will have to deal with smudges, nicks, and bubbles. Besides, thicker layers of polish take too long to dry.
The best way to apply nail polish is in three short and even strokes: the first one down the middle and then one down each side of the nail. Lift the brush as little as possible and always wait for the first coat to dry completely before applying the second one.
 StyleCraze Says
7. Always Apply A Top Coat

Once you finish applying your nail color, apply a topcoat. Make sure you swipe across the very edge of your nail. This way, you will be less likely to chip the nail paint.
StyleCraze Says8. Dip Your Fingers In A Bowl Of Cold Water

To help your nail polish dry quickly and prevent any creasing or bubbling, submerge your nails in a bowl of ice-cold water for about a minute. Also, avoid hot showers after polishing your nails for at least two hours.
9. Soaking Nails In Vinegar
To achieve a flawless nail polish application and avoid bubbles, consider soaking your nails in a mixture of equal parts water and white vinegar for a few minutes. This pre-application step acts as a natural cleanser and effectively removes oil or other residue from the nail’s surface. By creating a clean base, the vinegar solution enhances the adherence of the polish and reduces the likelihood of bubbles forming as the nails dry. This straightforward technique not only promotes a smoother and more professional finish but also extends the longevity of your manicure. Embrace soaking in vinegar for bubble-free, beautifully polished nails.
10. Store Your Nail Polish Properly

Storing your nail polish upright in a cool, dark place with a consistent temperature is essential for the formula to retain its consistency and prolong its shelf life. Always wipe off the neck of the bottle with a remover-soaked cotton swab before putting it away.
If none of these tips help, it’s time for a new nail polish. Just like makeup and skincare, nail polish also has a shelf time. Your nail polish may be expired and so there’s no way to revive it. Time for a replacement!
Nicole, a blogger, shared her personal experience of dealing with air bubbles in nail polish. She said, “If your nail polish needs mixing, roll it between your hands. I like to lay it on its side, hold it by the lid and “roll” it in the air while trying to keep the bead in it in one space.” She also suggested allowing time in between coats. She added, “I sometimes apply a coat of polish, reply to a couple posts on Twitter, then come back for the next coat. I especially do this if I know I’m going to need multiple coats of polish. The few extra minutes is well worth it (i).”
Infographic: Top 5 Easy Steps To Avoid Bubbles In Nail Polish
Almost every girl owns multiple nail polishes to make their nails look bright, colorful, and beautiful. Who doesn’t want a smooth finish for their nails without having to splurge at a salon? But when you try painting your nails at home, small nail polish mistakes can ruin the whole look. But, there are multiple nail polish tips you can use to avoid bubbles and consistency issues when applying nail polish by yourself.
Check out the infographic below to remind yourself of a few ways you can avoid bubbles from appearing the next time you apply nail polish yourself. Illustration: StyleCraze Design Team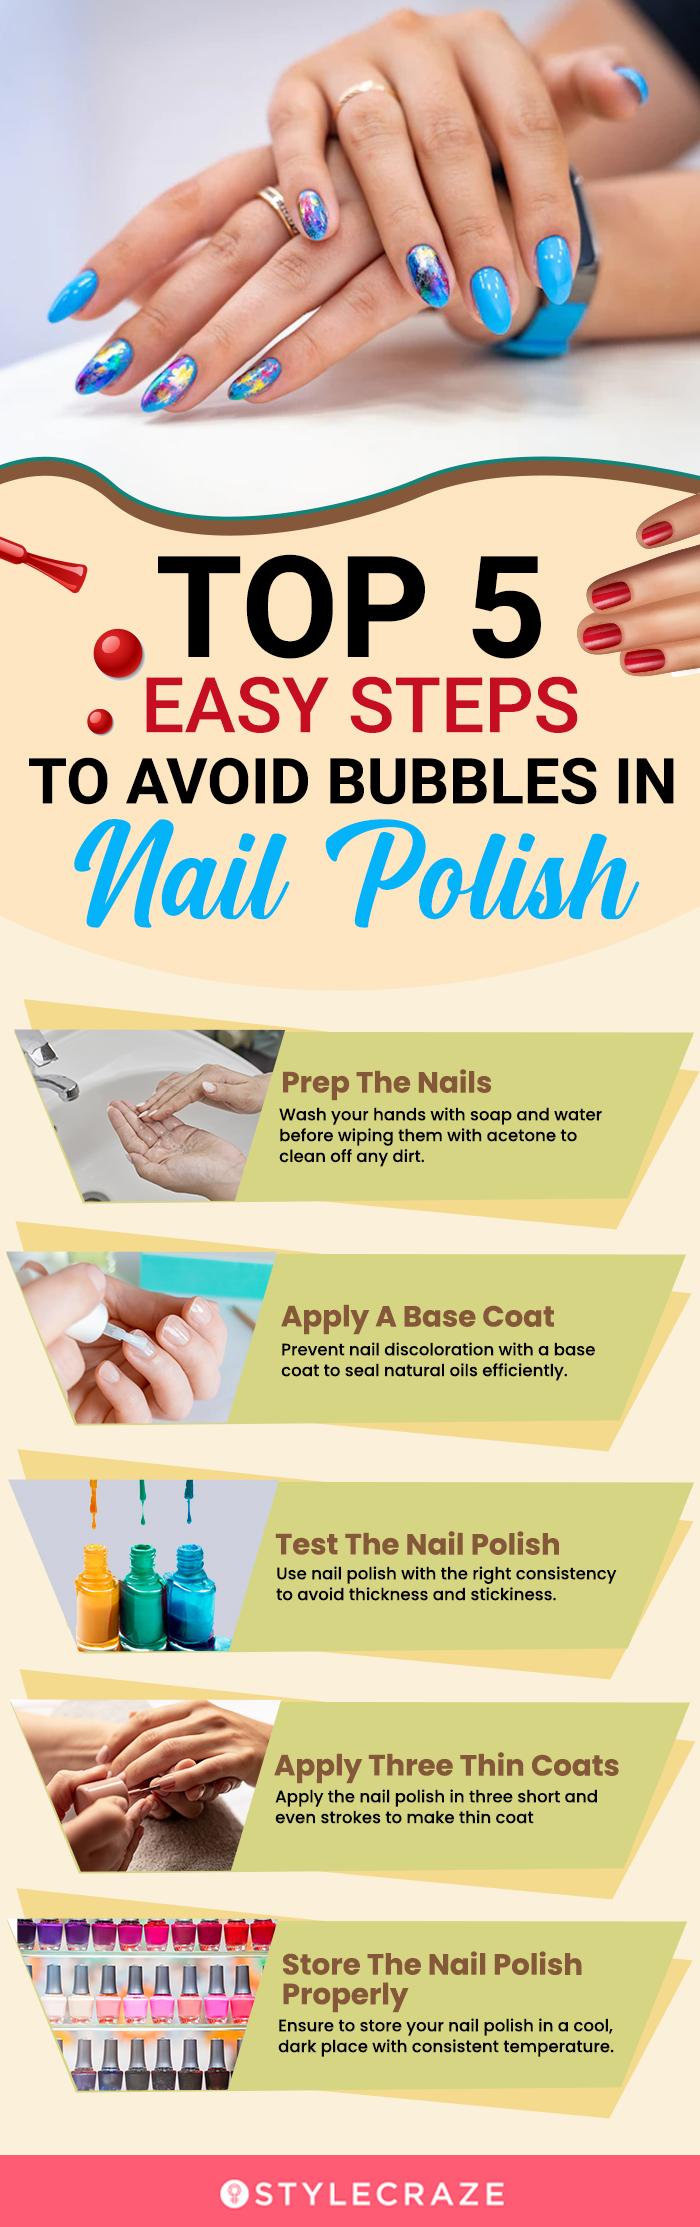
Save the high-quality PDF version on your device now.
 Download Infographic
Nail polish may bubble up due to various reasons. Everything from how you store your polish to how you prep your nails before applying the polish could be a reason for recurring bubbles that ruin your otherwise meticulously done pieces of art. Once they appear in your manicure, there is not much you can do about it besides starting over. However, by following these tips on how to avoid bubbles in nail polish, you may be able to do away with the issue at its roots. Despite all these measures, if your nail polish still turns up bubbled, it is time to trash it and get yourself a new one.
Frequently Asked Questions
Does cold water dry the nail polish faster?
Yes, cold water fastens the nail polish drying process. Dip your painted nails in the cold water for 3-5 minutes. The ice water thickens the polish, so it seems to dry quickly.
Can you use hairspray to dry nails?
Yes, using hairspray to dry nails is an effective hack. You can hold the hairspray about 8 to 10 inches away from the nails and spray.
Do nails dry faster with hot or cold air?
The cold air helps harden the polish. So, it is best to use cold air to dry the nail polish.
Key Takeaways
- There are several reasons your nail polish bubbles up — it probably is too thick, or you are not waiting long enough to let each coat dry before going to the next, or you are not applying a clear base coat.
- Using expired products may also cause your nail polish to bubble up.
- Dipping your fingers in ice-cold water helps your nail polish dry quickly, preventing creasing or bubbling.
This video will help you tackle the pesky issue of bubbles in your manicure. Learn the reasons behind bubble formation and gain valuable tips to ensure flawlessly done nails every time.
Personal Experience: Source
i. Bubbles In Your Nail Polish: The Reason & The Remedy
https://polishmeplease.wordpress.com/2012/01/13/bubbles-in-your-nail-polish-the-reason-the-remedy/


