How To Wear A Saree In Different Ways To Look Slim And Tall
Transform your silhouette with these tricks and tips and turn heads at your next event.
Image: ShutterStock
It is undeniably true that nothing can ever beat the sheer grace of a saree. These six yards of ultimate elegance can make a significant difference to your look if draped the right way. But how to wear a saree is what concerns most people. If you are new to wearing a saree, or a veteran looking for unique styles, a novice, or just recently married, we are here to address all your concerns relating to saree draping. So go on and check out the tutorials listed below. It is time for you to flaunt your desi look!
 Ace The Look
- Jewelry Design: Pair traditional sarees with gold or silver jewelry, such as necklaces, earrings, bangles, or anklets. For contemporary sarees, add statement pieces or experiment with fusion jewelry for a modern touch.
- Blouse Design: If the saree is simple, incorporate elements like embroidery, sequins, lace, or cutwork to add visual interest and enhance the overall saree look. On the other hand, pair a heavily embellished saree with a simpler, solid-color blouse to let the saree shine.
- Sleeve Style: Three-quarter sleeves offer a balanced and versatile look. Cap sleeves create a delicate and feminine appearance, and bell sleeves add drama and movement to the outfit.
- Hair Style: A classic bun can be an elegant choice that keeps the focus on the saree. Loose curls can add a soft and romantic touch, enhancing the feminine appeal of the ensemble. A sleek ponytail can create a sophisticated and modern look, especially for sarees with contemporary designs.
In This Article
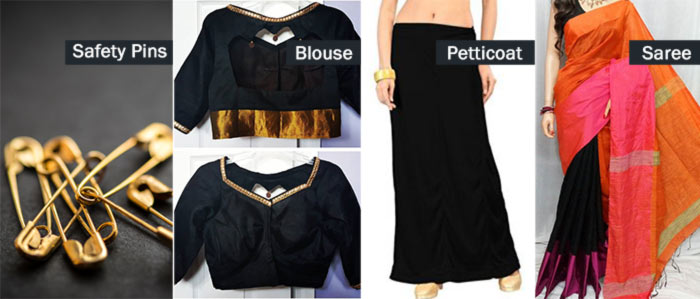
The Absolute Must-Haves To Drape A Saree Perfectly
How To Wear Saree Perfectly? Step By Step Guide
Ensure that you’re wearing the petticoat (skirt that matches the saree color) and it’s firmly tied at the waist. You’re going to tuck most of your saree into this, and thus, this needs to be done right. If you plan to wear high heels, do that before you start draping—this will get you the ideal length and prevent you from tripping over your own pleats.
Tia Bhuva, a YouTube vlogger, shared her experiences while draping a saree. She explained that one of the biggest mistakes people make with sarees is not ironing before wearing them. She explained, “You want to make sure you’re starting with a blank slate and making it as easy as possible for you to drape and pleat whether that’s your palu or your front pleats. So, iron the entire sari for the easiest route to beautiful pleats (i).”
 Fun Fact
Here Is A Step-By-Step Tutorial
Step – 1
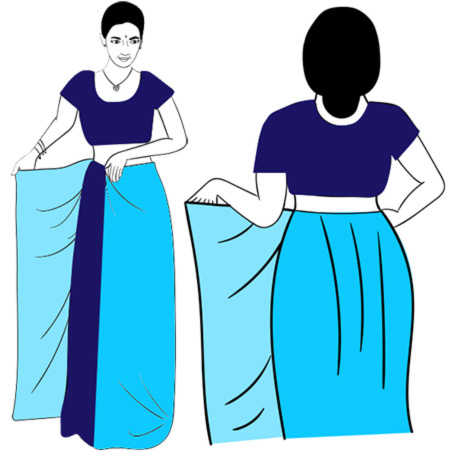
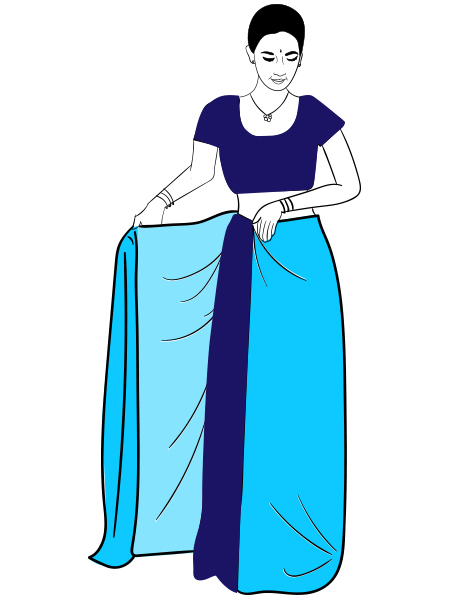
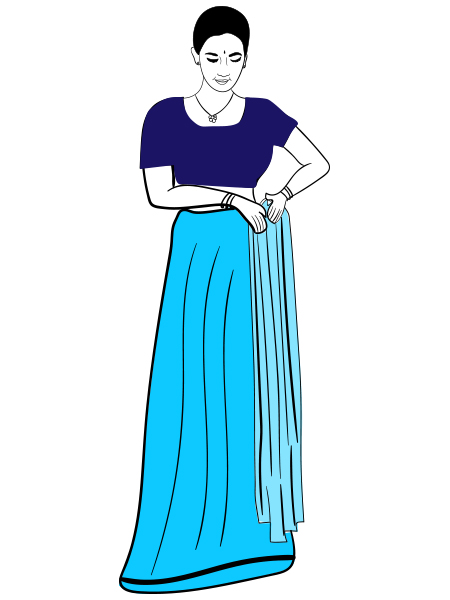
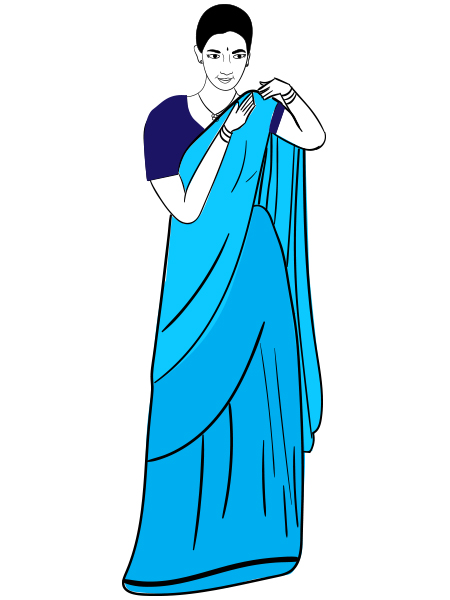
Start from the plain (non-pallu) end, and tuck in the fag end just near the belly button. Continue to swaddle from the left side, and complete the round from behind till you reach the point where you first started.
Step – 2
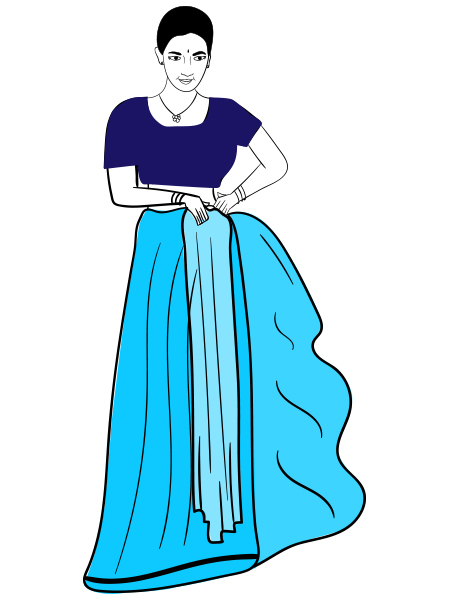
Yank the saree to the front and begin the pleats roughly about the size of the finger stretch from forefinger to the thumb.
Step – 3
Make anywhere between 5-8 pleats, depending on the material. Stow the pleats into the skirt and secure with a safety pin towards the left side of the waist. This trick will help the saree stay intact when you move about.
Step – 4
This leaves you with the pallu. You now have a choice of either letting it flow (short or long floating) or pleat it together.
Step – 5
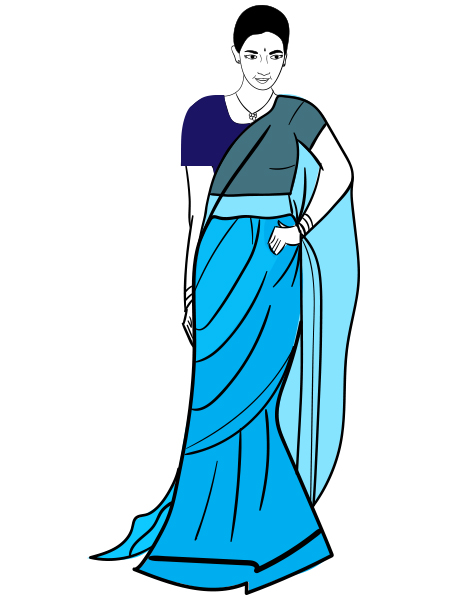
For a floating look, all you need to do is bring the pallu towards the left side of your shoulder, from under the right arm, and pin it on the left shoulder. Hold it either at the forearm or leave it until the end. It’s a matter of choice, really.
Step – 6
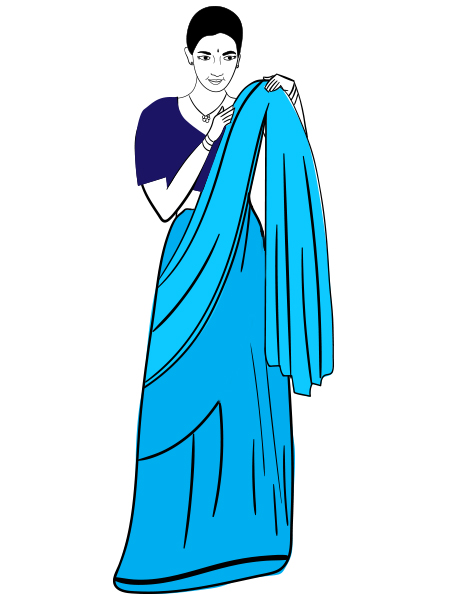
For the pleated look, bring the pallu from under the right arm and make vertical pleats (about 5-6 inches) with the border (if any) being the first pleat. Continue along the breadth of the saree.
Step – 7
Now, pin it near the left side shoulder, but ensure there is at least one meter left.
This style is the basis for most of the other styles, so master this, and you’re well on your way to being a pro in saree draping. Watch the demonstration video below, maybe a couple of times, and you’re sorted.
Video Tutorial : youtube.com
Other Ways Of Wearing A Saree
2. Marathi Style Saree Draping
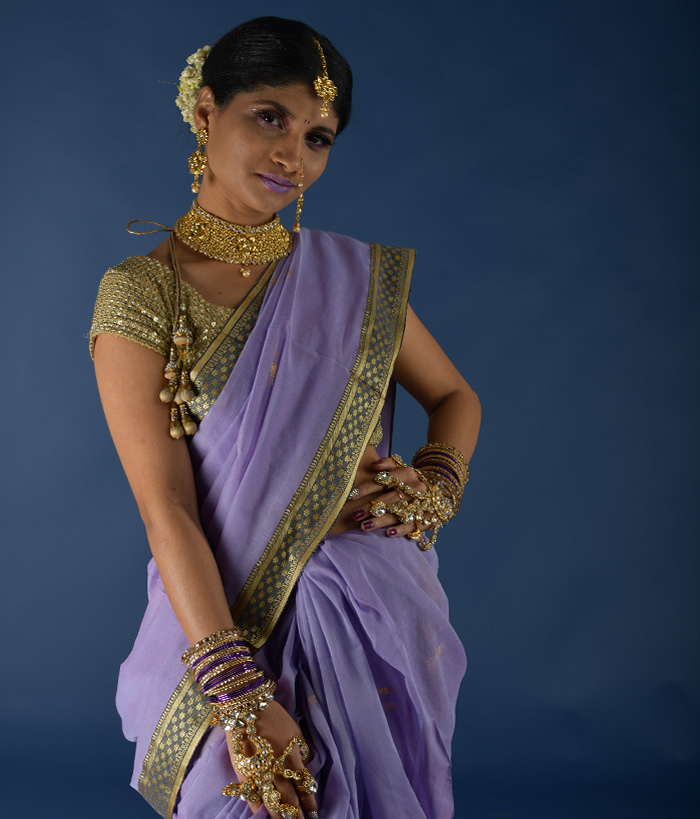
This traditional Marathi style saree draping makes for a rustic and country-chic look, if done well. A look that is going to have some heads turning and will give you the much-needed attention. Unlike the other styles, this needs a nine-yard saree and not the regular six yards. Plus, you also do not need an underskirt, although most of them wear either shorts or knee-length leggings. Wear the nose ring, which is also called the ‘nathni’, tie your hair in a chignon updo, wrapped in jasmine flowers, and flaunt glass bangles and temple jewelry.
Step-By-Step Guide
- Start with the saree behind you, and hold the plain end of the saree in your left hand.
- Leaving about a little less than a yard at the left end, tie a knot at the right side of the waist, above the belly button.
- Now, take the shorter end of the loose end, and yank it from between your legs. Make thin pleats (if needed) and tuck it at the back. Pin it so that it stays untouched.
- Run your fingers along the remaining width of the saree, making pleats. Pull it over from under your right arm and securely pin it on the left shoulder.
- You will now be left with the length that is just enough for the pleats. Tuck these over the knot near the waist, slightly towards the left.
- Remember that the Marathi style sarees are an inch above your feet, anything higher or lower than this might spoil the look.
 Trivia
Video Tutorial: youtube.com
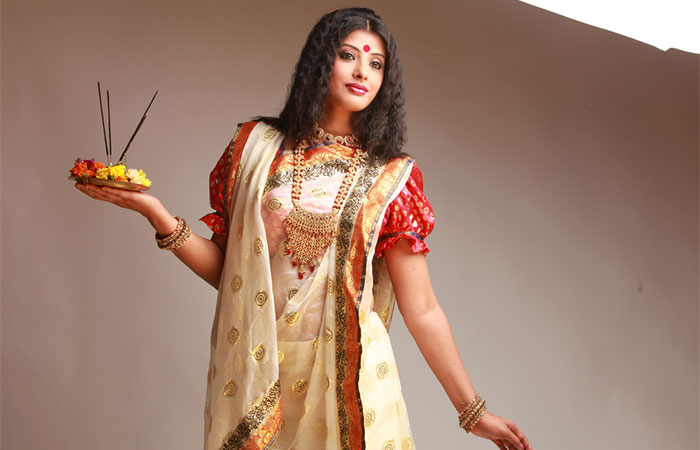
3. Kerala Style Saree Draping
One of the most elegant looking sarees that has become a thing, and not just at traditional Kerala weddings. An interesting change from the regular bridesmaid’s attire, perhaps. This conventional handloom saree originated in an off-white and gold border combination, but is now available in myriad shades (for the border). If you’re considering this for your girl tribe, they can each select a contrast color for the blouse and jazz it up.
Step-By-Step Guide
- This style gives you a two-piece (half-saree) output that is a staple for Kerala saree draping.
- Place the entire saree behind you and bring one end from the left side and the remaining to the right side of your body, as shown in the video below.
- Make about two broad pleats, and ensure the gold border sticks out. Tuck this at the waist.
- There are not many pleats for this style, unlike the others. So, neatly adjust these before you move to the next step.
- Take the remaining part of the saree and make thin pleats with the pallu border on the left.
- Secure the pleats with a safety pin at the left side of your shoulder. This style does not need you to pull it from underneath your right hand arm.
- Now, take the right end of the pleated bunch and pull it from under your right arm.
- Bring this to the left side and tuck it near the belly button.
- Iron out any parts of the saree that seem to be standing out, and viola!
 Quick Tip
Video Tutorial: youtube.com
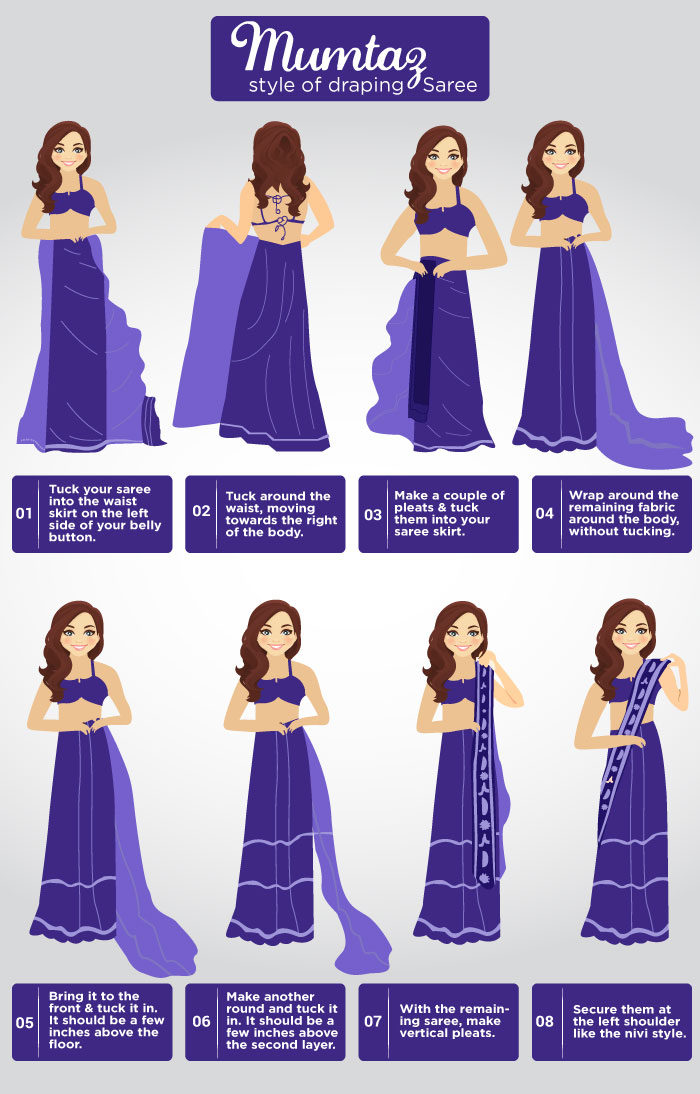
4. Retro/Mumtaz Style Saree Draping
Bring back the retro look in style, we could all use some drama! Especially the die-hard Bollywood fans. It is very easy to pull off. For sangeet or mehendi parties, or any Bollywood themed house parties, this is pure fun. Let’s reminisce the good old times and hum the superhit number of the time – ‘Aaj kal tere mere pyar ke‘ – and slay it in style.
Step-By-Step Guide
- To begin with, we’d say a chiffon or a georgette saree with a thin border works best because of its form-fitting texture.
- A sequinned blouse can be worn to compensate for the relatively simple saree.
- Do the basic round of tucking the saree around your waist.
- Start pleating, but make just a couple of them. Secure by tucking them below your belly button.
- Take the remaining part of the saree and toss it around your waist like the initial round, except you need to do the tuck at least above four or five inches from the first one.
- Make another round, and this time the tuck needs to be five inches above the second level.
- With the remaining part of the saree, make thin vertical pleats just like the Nivi style. From beneath your right arm, pin it up near the left side of your shoulder.
- You’re all set to rock the party!
5. Mermaid Style Saree Draping
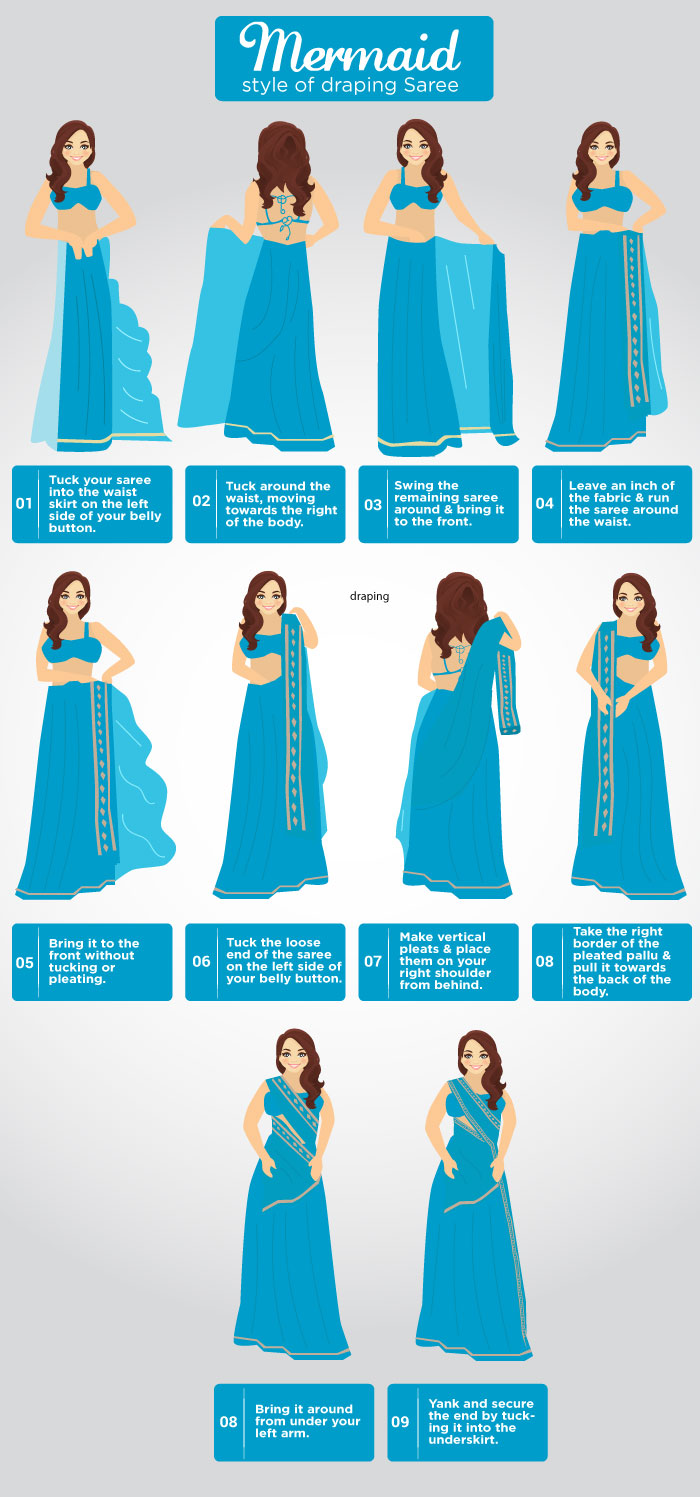
Another charming choice for new brides, it is sheer elegance. This style complements the half and half sarees the most; a pallu that is embellished is even better. If you want to flaunt your hourglass figure or curves, this is your best bet.
Step-By-Step Guide
- Do the basic first round of neatly tucking the non-bordered part of the saree around the waist.
- Leave about an inch and secure it at the waist. This style needs no pleats.
- The remaining material will go around the waist. But first, tuck the beginning of the border at the left side of your waist, beside the belly button.
- Swing the remaining around and bring it to the front.
- Start making vertical pleats. They need to be as thin as the border. Put this over the right shoulder and let it fall in the front just a few inches above the floor, as shown below.
- If any part of the saree is remaining, tuck it all into the saree skirt without making any pleats; it should rather look like a skirt.
- Now, take the left end of the pallu and yank it towards the left side shoulder. Pull it from beneath the arm.
- Pull it under the pallu and pin it along with the inner skirt.
This graceful style of saree draping can effortlessly make you look like a pro.
Video Tutorial : youtube.com
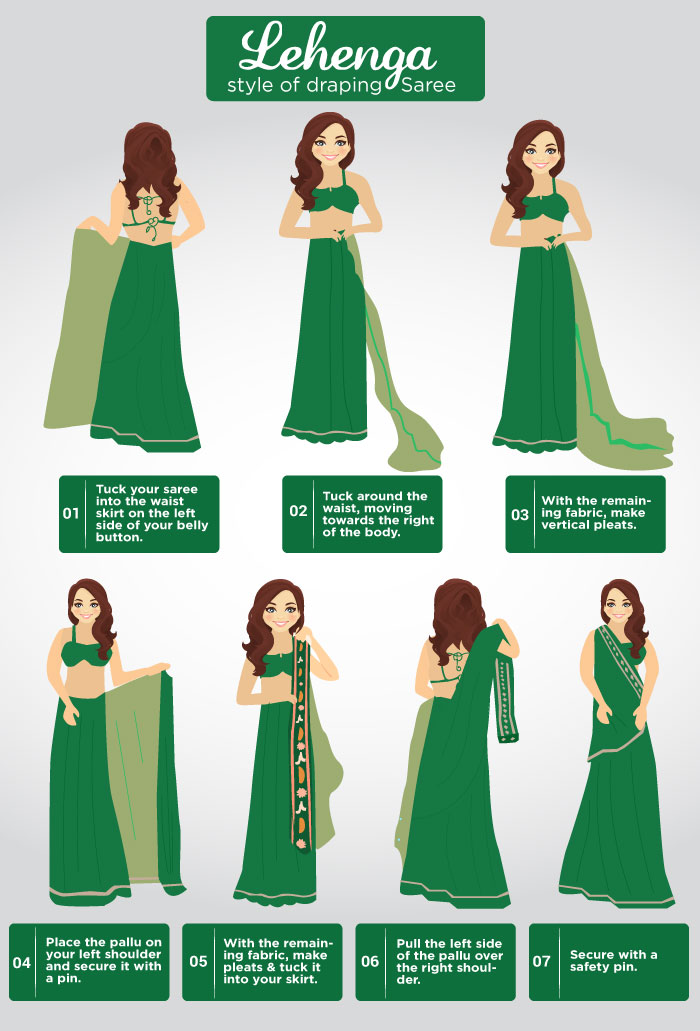
6. Lehenga Style Saree Draping
Ditch the boring traditional draping and don your saree in a celebratory style. You will be pleasantly surprised to realize how easy it is to pull off a lehenga style just with the regular sarees in your closet. Georgette or chiffon works best for this style for obvious reasons. Lehenga and the styles associated with it are here to stay, so let’s get to it and learn the techniques.
Step-By-Step Guide
- Do the basic first round of neatly tucking the non-bordered part of the saree around the waist.
- When you’re done doing the first round of draping, toss it around the back, leaving some part of the fabric for the pleats.
- This style does not have any pleats at the front – they are made at the back. It is the back pleats that give the illusion of the saree being a lehenga.
- With the remaining part of the saree, make vertical pleats like you would for the Nivi style.
- Fling them to the back from over your left shoulder and secure with a safety pin.
- Pull the right side of the pleated pallu towards the right shoulder, and hurl it behind to ensure it is all intact in the front.
- Pleat the remaining material at the back and tuck it inside your inner skirt.
It’s just as simple as that, so go ahead, give this a try. Practice it a couple of times, just in case.
Video Tutorial: youtube.com
7. Bengali Style Saree Draping
Bengali style saree draping, known as “Atpoure Shari,” involves the following steps:
Step-By-Step Guide
- Start by wearing a petticoat and fastening it tightly so it does not slip and can carry the weight of the saree.
- Take the top end of the saree and tuck it at the right side of the waist and make one complete round, bringing the other end to the right side.
- Take the loose end and form pleats (approximately 5-7) before tucking them into the petticoat, slightly towards the left of the navel.
- Now, drape the remaining fabric across the chest and over the left shoulder, allowing it to fall freely behind.
- Secure the pleats with pins and adjust the pallu (the part draped over the shoulder) to fall gracefully, forming elegant pleats.
This traditional Bengali style draping showcases the grace and beauty of the saree.
Video Tutorial: youtube.com
Infographic: Top 5 Saree Draping Styles You Must Try
The Nivi style saree is the most common one that people wear all across the globe. However, there are other saree draping styles as well that you can try. If you are tired of wearing your saree the same old way and want to try something different, this infographic is for you. It will take you through the 5 most stunning saree draping styles you can try. Check it out!

Illustration: StyleCraze Design Team
Save the high-quality PDF version on your device now.
Download Infographic
Many people find it challenging to learn how to drape sarees the right way. But practice makes it perfect. And now that you have read this article, you are certainly not the last person to be intimidated by saree draping. We have it all sorted for you. All you need to do is learn how to wear a saree by following the steps religiously. And be patient while you are at it. Once you ace the art of properly draping a saree, you shall move closer to being able to stand out in the crowd.
Frequently Asked Questions
Do we look fat in saree?
If draped the right way, sarees will not make you appear bulky. However, it also depends on the saree’s fabric, color, and print.
Which color saree makes you look slim?
Usually, darker colors give you a slimmer look than lighter ones.
What is pallu called in English?
The pallu of a saree can be referred to as an end-piece in English.
Key Takeaways
- Wear high heels before draping the saree to get the perfect idea of the ideal length you want.
- Secure the pleats with a safety pin to ensure they stay intact in their place and do not unfold easily.
- You can alter the length and style of the pallu according to your preference, be it flowing or pleated.
- Aside from the classic draping style, you can try variations such as Marathi style, Kerala style, retro style, mermaid style, and lehenga style saree draping.
Learn the basics of saree draping in the beginner-friendly video below! Get step-by-step instructions on how to wear a saree with ease and confidence.
Personal Experience: Source
i. Saree Hacks Part 1 | How to Wear Saree for Beginners | Tia Bhuva
https://www.youtube.com/watch?v=biCKxRZ2OtE


